

What is API Gateway ?
An API gateway is an application that sits in front of an (API) and acts as a single point of entry for a defined group of microservices. The reason to opt for Gateway for the Business is
- Security
- Load Balancing
- Caching
- Routing
- Quota Access Management
- API Versioning
Tibco Mashery is one of the leading API Management tool which offers the above functionality in its product .
In this blog, we will create a simple API in Mashery and expose the secured one to the front End Users using the below process.
- API Creation
- Package Creation
- Application Creation
- Testing
Pre Requiste : Mashery Control Centre , Mashery Local
API Creation :
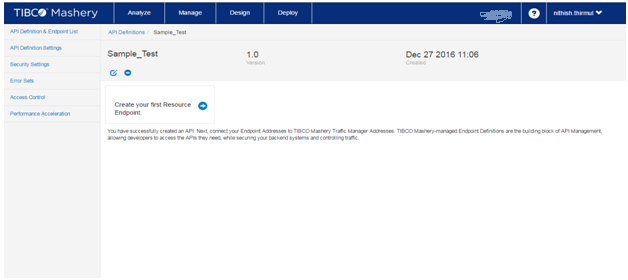
Step 1 : Login to the Mashery Control Centre . In the Home Page Select a Create a New API

Step 2 : Give the Name and the corresponding required Details for the API and Click Create

Step 3 : Create your First Resource Endpoint for the API . By clicking Create your First Resource Endpoint
Step 4 : Give the API Details like Public Endpoint Address ( Exposed to Front End) , Your Endpoint Address ( Internal System Service IP )

Step 5 : In the Access Control Tab , Restrict the API to the roles

Then Save it . Now we have successfully created the API .
Package Creation :
Step 1 : Go to Home Page ,Click Create a New Package . For the Package
Give the Name and Click Create.

Step 2 : Create a plan for the package and in the Corresponding plan select the API that we have created earlier. In Plan Designer link the API .

In the Access Control tab , Restrict the Package to the roles .
In Rate limit Tab , Define the Quota period for the Package.
Post all Configuration Click Save. Now our Package is created.
Now we need the api_key for the Front End users to Access the API. This can be done in Application.
Application Creation :
Step 1: Go to Home page , Click Create a New Application . Give required details and create it.

Step 2: Post Creation , Create a Package key for the Required Application. In the below attachment we have selected the Package Plan that we created in previous steps. Click Create . Our Api_key is generated

Step 3: Post Creation of API key , it will be in waiting stage. Only the administrator can make it Active.

Now we have Succesfully created API , Package and Application. Before our testing we need to make sure Two Steps. Need to make our apikey active and then Sync all our changes to Mashery Local.
Enabling the API key from waiting to Active can be done by Executing this step Home Page > Manage > Package Keys . Post click on waiting our keys will be enabled.

Now Lets Focus on Mashery Local.
What is Mashery Local ?
It is a on premise API Traffic Manager setup. Basically Our API request from Control centre will be flowing to Local and gets validated there. Post Successful Validation . It will be routed to Internal System API in the premise.
Why we need here ?
Basically whatever changes has been modified in Control centre the corresponding changes has to be synced in Local. (Eg) Increasing the Time out for API , Changing the Endpoint for API.
Go to Mashery Local > Cloud Sync > Developer and API Settings
Sync all the three settings in the screenshot

Testing
In postman give the Public Exposed API IP along with the API key in the URL. In the raw pass the request data and test it.

